Dystopian Wars time again, and I must admit I’m tempted to just write “different Ships, painted the same way”, but that wouldn’t make for a very interesting posting for you dear reader would it! So in my vain (sadly) attempts to keep up with the Myles and his ever growing Antarctic fleet of cowardly “wave lurking” doom, I dragged out the of the slightly bigger components of my brave Prussian navy (as you can see there is no bias in my writing of this blog!) the “Kaiser Karl” class Heavy Battleship, and as this wasn’t going to take me all week to do (little did I know, but I’ll get to that in a bit!) I also retrieved the three Stolz Class Destroyers, well they were all going to end up the same  colours after all.
After a quick clean-up of the hulls and the Battleships bridge structure I superglued this to the main body of the Battleship. I added a small sausage of greenstuff to the rear of this where a half round section fitted into a recess of the same shape as the joint was a little loose fitting. I also added a small ball of greenstuff into the “dimples” on the deck where the gun turrets would sit to make the joint more secure.
Now turning to the gun turrets I could have fitted either a “Internal Shield generator”, Calcification Generator or a “Tesla generator” where the middle turret goes but after using this model in a game last weekend (yes it was unpainted at the time, and yes I am suitably embarrassed by the admitting this!), I decided that I preferred the extra fire power over the different effects these generators offered. Now I know I could have left this loose and then had the option to change it at my whim, but I do prefer everything glued solidly into place. Now the middle gun in question is actually of a different design to the other two, though Myles says that there is nothing in the rules about it working any differently to the other guns (it wouldn’t surprise me if this is really some sort of magnificent super weapon that costs no extra points, but he’s not telling me!). Now strangely whereas the resin bodies of the ships were remarkably clean castings the metal gun turrets were a bit rough and needed quite a bit of cleaning up with the old knife and file before they were added, but eventually they were ready for the customary trip out to the garage for a coat of matt black before the painting could begin in earnest.
Right so as usual they were given a dry-brushing with chain-mail after the undercoat. This was followed with me painting in the decks with chocolate brown and after this was dry I added highlights to these using leather brown, they were then left overnight to dry, and that’s where I made my fatal mistake!! It wasn’t until next evening that I returned to continue with their painting only to discover that I had left then out on the top shelf of my painting desk and one of the cats (I can’t say which though I have my suspicions, yes I’m looking at you Ozzy!) had knocked the battleship off of the shelf breaking the forward turret off (not a big problem as I could just glue it back on), and knocking a small chunk of the prow off (more of a problem as I couldn’t find the piece) so the rest of that day was spent
  rebuilding the prow with green stuff, it’s not perfect but I don’t think you can see it if you’re not looking for it (sadly for me it stands out like a sore thumb). But back to the painting, the hulls were then given a dark grey undercoat before I added the “Dry-brushed” lines in light grey and black. Then the dots were added in coffee and the funnel tops and some details were picked out in bronze. Finally I decided to add some “dayglow” green highlights to the “different” gun in the middle of the battleship as if it were some sort of “laser” or energy type weapon. Then it was a coat of Quickshade and a “blow over” of matt varnish and they were finished.
As I had the Quickshade out I decided to coat a few more of my WW2 collection, so I knocked out a few of my Germans (as many as would fit in the box I was going to let them dry in anyway) including my PAK40 and the first of my Opel Blitz lorries, then flocked and matt varnished them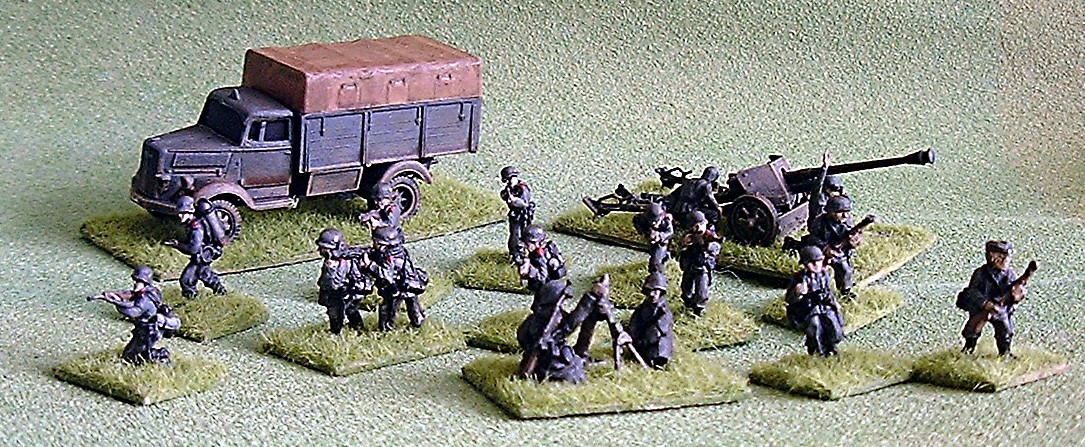 as well. I hope to get one more posting in before Salute next weekend, and if all goes to plan that will be on Friday evening, but not too late as I hope to get to bed at decent time as we have an early start next morning.
So till then, Cheers Roger.

Great stuff once again Roger, as I thoroughly enjoy seeing your naval vessel camo. I’ve had a good look at your damaged model and I can’t see where you’ve repaired it (photo angle maybe?). You’re certainly making that game a temptation for me. Good work on the Germans too… that’s quite the collection of WW2 you’ve quick-shaded and re-based now… and the promise of another posting before Salute? You are going to be busy 😉
Thanks Simon, you can see the repair if you look carefully the very tip of the prow isn’t quite as smooth as it should be, but it’s the best I can do, as I think the ship are 3D printed and I can’t compete with the accuracy of a computer. The game is really rather good and I would recommend it, I only fancy the naval stuff myself though as I’m not as keen on the land forces. They have however started doing some 28mm figures based in the same “universe” as it were and these look rather nice (Myles isn’t keen on them though, sometimes you just can’t win!).
Still got a few Germans to Quickshade, and hope to get them done over the next couple of weeks. I was up in the loft yesterday looking fore something when I came across my wild west figures, and I think they might benefit from a Quickshading too so they might be next.
No promises of another posting, but I’ll try, I know what I’m going to paint next but getting it finished is another matter entirely!
Cheers Roger.