
Well progress has be going apace at both mine and the “Dennis’s” houses, he has been working on the various pieces of armour he needs to complete the look of his costume, whereas back at my homestead I have been banging away at getting the insignia finished for his badge, so without further ado this is where I’m up to and how I got here…,
When I left you last week I was adding the rows of scales that work their way up the beastie’s neck, not very exciting stuff but quite time consuming, as each one had to be added separately as a teardrop shape, then all around the edge had to be pushed down in a seal type fashion, then the central “ridge was added either with my fingers or if it was butted up to the next one with the flat of a blade, then taking one of my rubber tipped shapers any finger prints were smoothed off and the shape was refined, lastly taking my pointed shaper the “ridge” was enhanced and made more prominent.
Next day it was the same again, though this is the last “full” row as the next one needs to be blended out into his face, so the next few bits should be a little more interesting (for me and you).
Right well “ear” we go then (sorry couldn’t resist), I decided after a bit of an internal debate that it would be better if I added the ear first and then worked up to it. So after mixing up a grape sized ball of putty, and breaking the piece away from the acetate (so I could  see what the ear looked like) I roughly made if the right sort of shape (without the indentation in the middle of course). This was then plonked into place and blended in at the lower edges, then after I was happy with the general shape, I pushed in the central indent, and added the small ridges with my pointed probe (the one shown in the banner at the top of the page in fact). Once happy with this I had a bit of putty left so also added the large “scale” that runs down from the corner of his mouth.
Now it was time to add the top row of scales, these would be blended away into his face, so using the same technique as before they were added, and then smoothed out around the bottom of his ear.
I set to work on the lower part of his jaw next day, I began by attacking the whiskers I’d put on his chin as these seemed a bit small and far too “furry” looking now, so a layer of putty was put over these and then new more “stylized” swirls were added. Then a sausage of putty was run along under his teeth and shaped to form his lower lip. Finally I added some putty to the top of his head to get the final shape here (though I seem to have forgotten to take a photo of all this, do’h!).
His upper muzzle was next on the agenda, so I began by adding his nose, to do this I first put the piece back over the picture and added a small sausage of putty funning  upward from where his nose was before folding it over toward me and smoothing it into a dog nose shape. Next I smoothed out a layer of putty over his muzzle blending it into the area around his eye. Gums were added then by taking another sausage of putty and smoothing this over the area I had left above the teeth and yet another was run along the top of this and shaped to form the top lip. Two more pieces were added above this to add a little more interest to muzzle (and help fix the nose in place), these are not exactly like the original, but not my only bit of artistic license so I can live with them.
That just left the eye to finnish off, this was done by adding upper and lower eyelids, that were of course two more sausages of putty that were run above and below the eye and then shaped and run away up toward the top of the ear, I also added a little more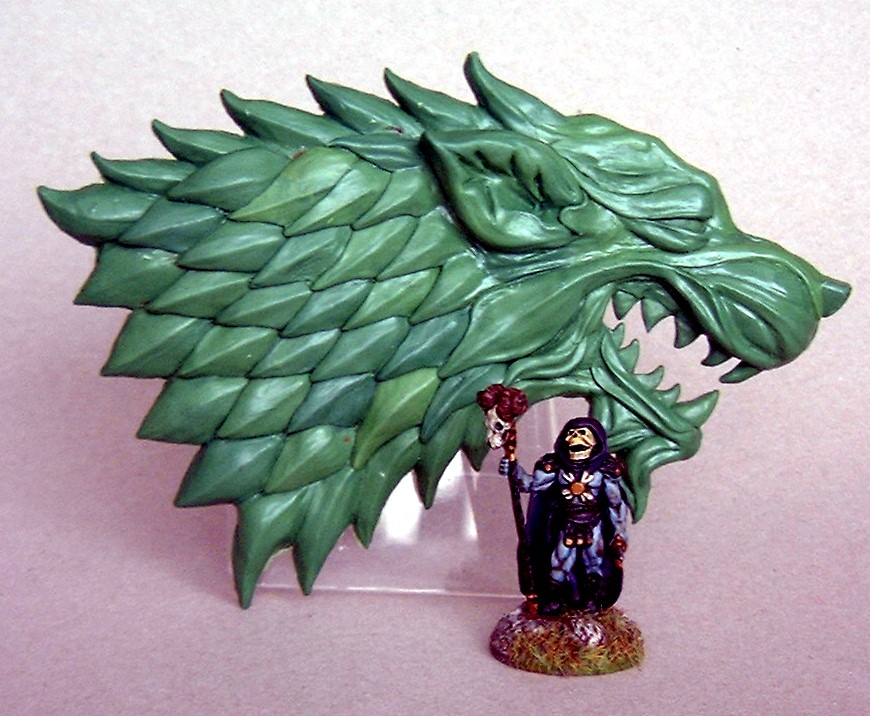 putty to the area above the eye added a little shaped detail for interest and the odd spot here and there where it needed tidying up and it was done. Totaling up my time I figure I have about thirteen hours of sculpting in this piece now and probably one and a half golf balls of “greenstuff”. This is easily the biggest single piece I have created from scratch (I’ve stood my 28mm Skeletor figure next to it in the final photo to give a reference for scale), I’m pretty happy with how the final piece came out, I’ll find out tonight whether Dennis is as happy, wish me luck!
Next time mounting and painting, so till then. Cheers Roger.

Well you nailed that Roger, what a cracking job!
Many thanks Michael, if it gets your seal of approval I fell a little less nervous about showing Dennis.
Cheers Roger.
Awesome Roger, simply awesome. That looks incredible!! 🙂
Thanks Simon, most appreciated.
Cheers Roger.
An absolutely stunning piece of sculpting, Roger. That truly is a work of art.
Many thanks Bryan, from one trained as yourself that really is a compliment I’ll take with pleasure!
Cheers Roger.
That looks absolutely brilliant!
Many thanks for that Roy, (Dennis seemed quite pleased with it too, thank god!).
Cheers Roger.
Hi Roger, wow. I still think you should cast it, as he could put them on multiple accouterments…like I said, Dennis is lucky!
Thanks Mark, well it’s too late to get it cast now if I wanted to, I passed it over to Dennis today, though it has now returned with me as it is now glued to the part of his armour, and I now have to paint the lot up!
Cheers Roger.
Roger that is amazing! Really, really good!
Many thanks Andy, really appreciated.
Cheers Roger.
Very nicely done, Roger. Looks exactly as it should and Dennis should be justifiably pleased.
Once you’ve completed this project, hopefully this will renew your enthusiasm for painting or modelling at 28mm.
Thanks Jez, I have taken the odd liberty here and there, but I think the overall look is about right, he did seem pleased, though I appear to have made more work for myself now.
If this project ever comes to an end (please god let it end!), I think I will need a lie down in a darkened room for a couple of weeks before I start anything else!!;-)
Cheers Roger.
Awesome, Roger! That’s one great-looking wolf (and a lot of green stuff!) Glad to see you’re back!
Ha ha, yes it was a lot of greenstuff! many thanks piper, (for some reason I had to approve your comment again!, bl**dy wordpress), I also can’t seem to get onto your blog via my link as it says it’s not authorized (odd could you send me another link and I’ll try again ). Anyway thanks again, and it’s good to be back.
Cheers Roger.
Looks gorgeous. I love everything about it. Your friend must be ecstatic.
He was rather pleased D&B, however it just go me more work to do as you can see from, my latest post!
Cheers Roger.
I am half way glad he decided to let you paint it. Can only get more awesome, even though it means more work for you, too.
Ha ha, notice you wrote this before I posted my results! 😉
Cheers Roger.